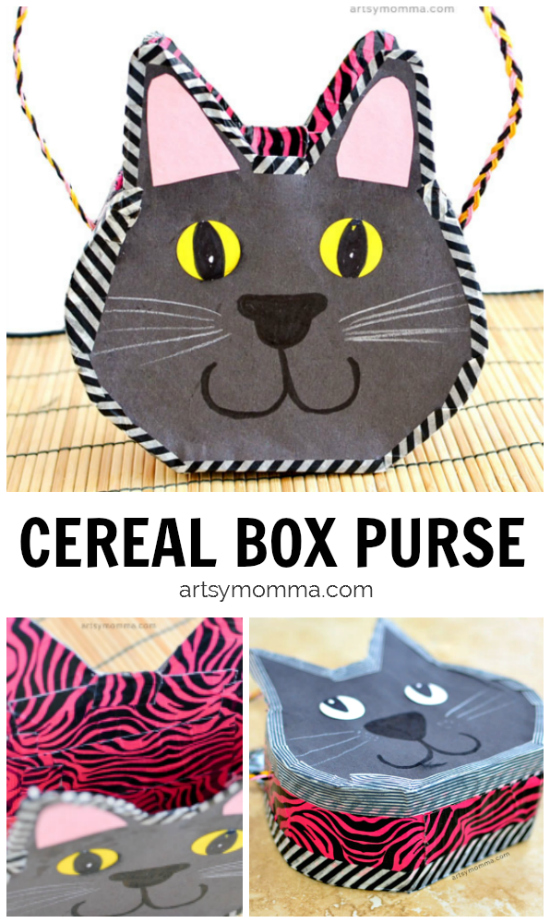
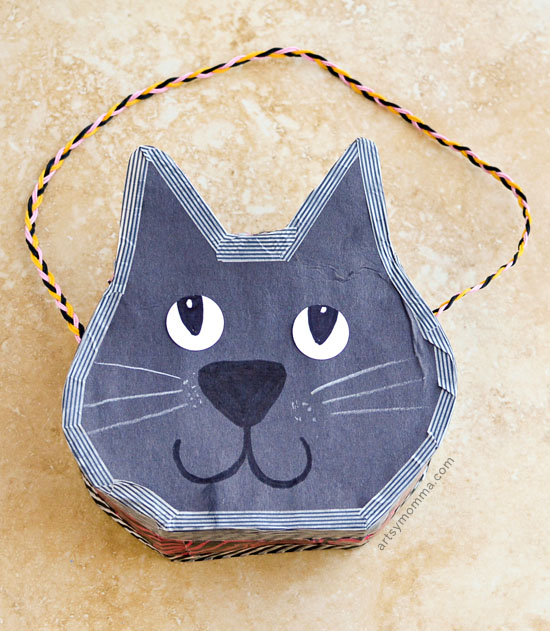
Black Cat Cereal Box Purse Kids will Adore
Does your little one love playing dress up? If so, they will adore this black cat cereal box purse craft. Slightly older kids can make it themselves while younger can have an adult or older sibling help make it. They can wear it for fun and even use it for storing a few treats once Halloween rolls around.

Black Cat Cereal Box Purse Instructions
*This post contains affiliate links. You can read our full disclosure policy here.
Supplies:
- cereal box
- construction paper

- duck tape
- washi tape; optional
- scissors
- black and yellow marker
- glue
- string/yarn/ribbon for handle


 ; optional
Instructions:
1. Find a circular object in the size you would like the purse to be. Set it on a sheet of paper. Ask the child to trace around the circle. Then, have them add an arch on both sides of the circle so that it is now an oval shape. Add two cat ears.
2. Cut the cat shape out with scissors. On the side opposite of the ears, trim it just a little so it is straight instead of rounded. This will be the template for the cat purse.
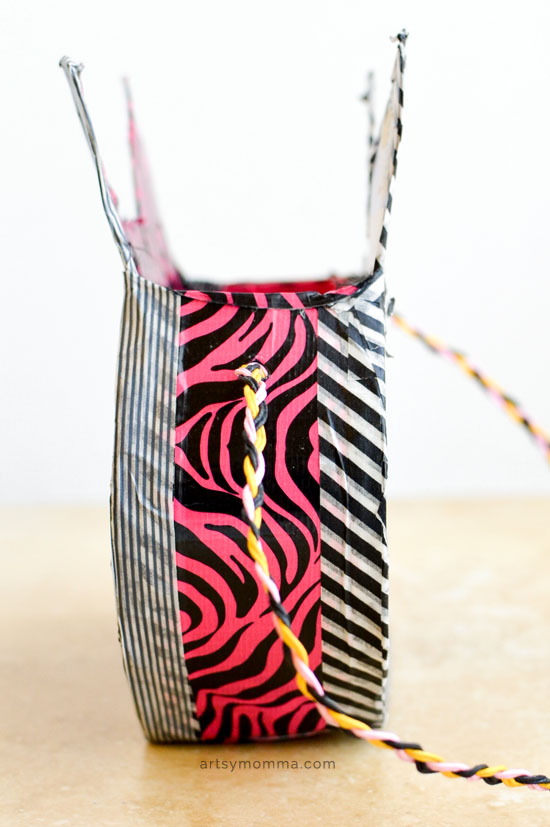
3. Take an empty cereal box and cut one of the sides so that you can lay it flat. To do this, cut where it bends/creases. Cut just this side strip completely off. Place it aside for step 7.
4. Turn the now flat cereal box so that it is vertical: front of cereal box at the top (A) and back of the box side towards you (B); there should be an uncut side strip connecting the two pieces (C).
5. Place the cat purse template on cereal box (A) so that it touches the edge of (C). The side strip (C) will make the bottom of the purse. Be sure to place the template with the cat ears opposite of this edge. Trace and cut around it EXCEPT for the bottom straight edge of the cat connected to (C).
6. Take the cat purse template and place it on the cereal box (B). It should be upside down and lined up with the placement of the cut cardboard cat (A). Draw lines on (C) to line up the cat face (A) with the template on (B). Adjust accordingly and then trace around the template. Cut around the lines on (B) and (C).

7. Next, take the strip of cereal box from step 3. You will be using this for the sides of the cat purse. Wrap it along the side of face starting at the bottom to measure the length. Cut it where it meets the bottom of the cat ears. Cut a 2nd piece of the same size for the other side of the purse.
8. Use duct tape to attach the sides of the two cat faces. I did the inside tape first and then secured it more by placing duct tape along the seams on the outside of the purse (where the edges meet each other). It should now resemble a cat-shaped purse… yay!
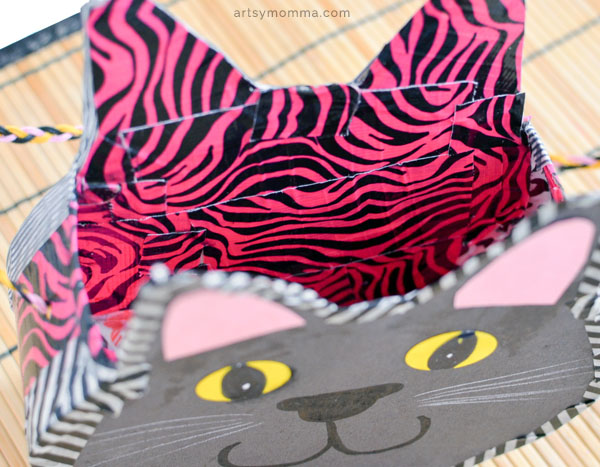
9. This step is optional, but I place the patterned duct tape completely covering the inside of the purse. Besides making it look cool, it also makes it stronger/ less flimsy. I also placed duct tape on the outside sides of the purse to give it a fun look.
10. Trace the cat template on black construction paper. Cut these out and glue them to the purse. Draw on a nose and mouth. We did both cat faces.
11. Also optional, take washi tape and follow around the seams placing one side of the tape on the black face and the other half on the sides of the purse. Repeat until all 4 sides are done, plus the bottom of the cat. I also did around the ears.
12. If you’d like, make the pink triangles for the cat ears. If not, move on to the next step.
13. Add jumbo google eyes or make eyes from the leftover cereal box pieces. Paint or color them before gluing in place.
14. Add whiskers. We used washi tape to create ours.
15. Finish the cardboard cat purse by adding a strap. You could make a paper handle or use a hole puncher and thread ribbon through it.

More Cereal Box Crafts
This month’s #kidcraftstars challenge is cereal boxes. Check out the cute crafts some of our blog buddies made:
Cereal Box Elephant Craft | I Heart Crafty Things
Cereal Box Pig Craft | I Heart Arts n Crafts
Cereal Box Pizza Craft | Pink Stripey Socks