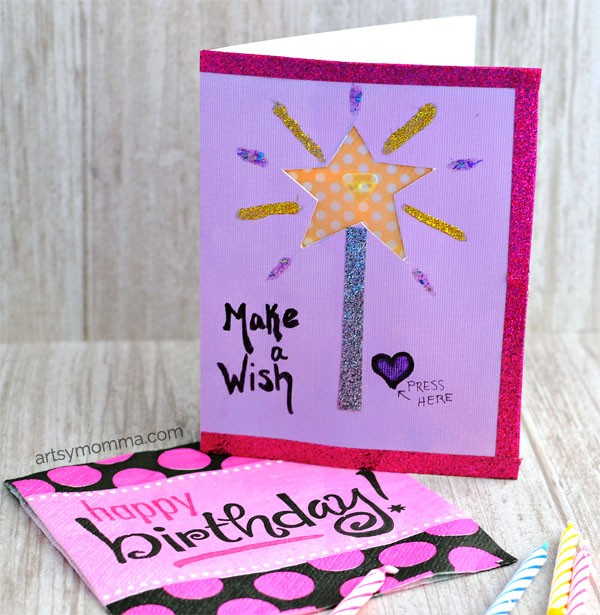
‘Make a Wish’ Light Up Birthday Card featuring Chibitronics
Have you guys seen all those cool light up projects? I love these by Left Brain Craft Brain so was super excited to find out that I got to work with Chibitronics for a Xyron design team project. Using their LED circuit stickers, I made a birthday card that shines when you press the wand. Neat, right? This ‘Make a Wish’ light up birthday card is a fun project for elementary aged kids as well as adults.
About the Chibi Lights:
Chibitronics Chibi Lights Circuit Stickers are a creative and fun way to learn electronics. Circuit stickers are LED circuits on peel-and-stick stickers. Build circuits without soldering, plugging wires, or clips. Instead, use the stickers with conductive tapes to draw circuits on paper and other crafts. Learn to build circuits while make interactive artworks. It’s easy, fun, safe and creative. – Chibitronics Website

*This post contains Amazon affiliate links. We also receive products/compensation as part of the Xyron Design Team. Please read our full disclosure policy here.
How to make the ‘Make a Wish’ Light Up Birthday Card:
Supplies Needed:
- Chibitronics Chibi Lights LED Circuit Stickers STEM Starter Kit

- Xyron® Tape Runner
- Cardstock or Blank Cards with Envelopes
- Vellum
- Glitter Washi Tape
- Marker with a small tip (brush tip)
- Hobby Knife/X-acto Knife
- Foam Stickers/Tape


 or
or 


 (brush tip)
 /X-acto Knife
Instructions:
Practice building circuits using the booklet provided in the STEM Starter Kit. I used this awesome video tutorial for help with making the card using the Chibi Lights. Here’s what our card circuit process looked like:
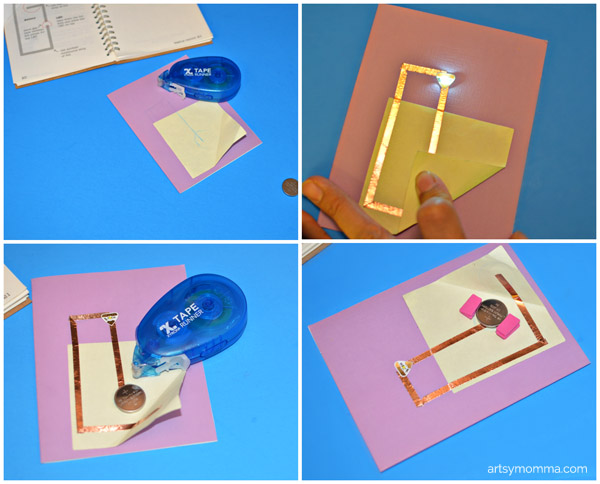
1. In the video, she placed a post-it sized paper on her card marking where she wanted the battery and light. Bend the bottom-right corner so it has a big enough spot for the battery. Trace where the battery will be. We used our Tape Runner to stick the paper in place leaving the folded corner without adhesive.
2. Using the sketch book from the starter kit, copy the circuit design – lightly draw the template over the small square and the card first. I also traced one of the circuit stickers where it would eventually be placed. Go back over the template with the copper tape. They recommend using a continuous line even when making a corner – don’t cut it, instead fold it back and flip/turn it. You will have 2 continuous copper tape lines with a small gap where the circuit sticker goes.
3. Place on the sticker making sure to touch both lines of copper tape. Test that it works by bending the corner on to the battery.
4. Use the Tape Runner to stick the battery on to the card (where the small square paper is). Place foam sticker around the battery to assure that it stays in place. In the video, she recommends layering the stickers until they are slightly higher than the battery. The video is so thorough with her explanation so be sure to check it out!
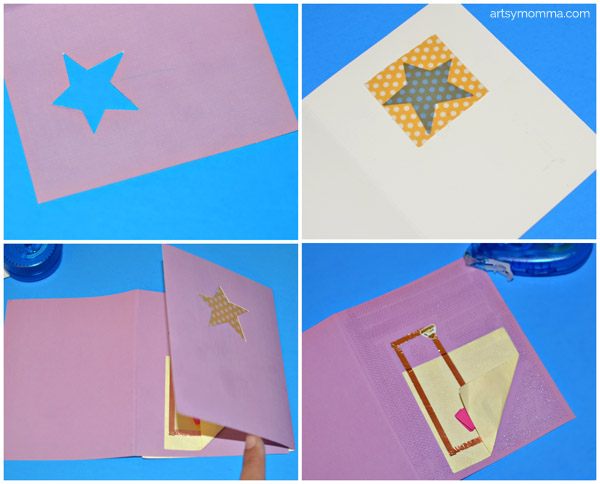
5. Take a 2nd card and insert the circuit card inside it. (photo 3 in collage) Make a dot where the light is.
6. Lightly sketch a star shape where you made the mark. Use a hobby knife to cut out the star (photo 1 in collage).
7. Take a small square of vellum that is big enough to cover the star and adhere it to the back side (the white side in our photo). This is where the tape runner is better to use than glue. You want to be sure that you don’t accidently have glue ooze out on to the circuit sticker or copper tape.
8. I cut the star card in half and used the tape runner to stick it on the light up card. Be careful not to get any adhesive on the copper tape or sticker. She uses foam tape in the video which I wish I would have done (I only had small stickers). Using the foam tape allows the vellum to be a little further away from the light.
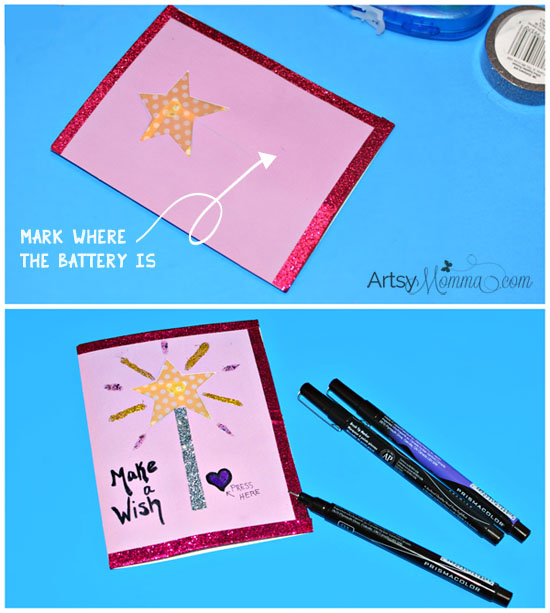
9. Add sparkly glitter tape to the edges of the card. This assure that the top card stays put. To do this, place half the tape along the front edge and then fold the remaining half on to the back side.
10. Make a mark where the button is. Cut a small piece of the glitter tape to use as the stick part of the wand. Tape in place without covering up the spot for the button.
11. Where the button is, place a small sticker or draw a small shape such as a circle or heart. Write ‘PRESS HERE’ next to it.
12. Write ‘Make a Wish’ next to the wand.
Optional: Add glitter glue streaks coming out from the star if you’d like.
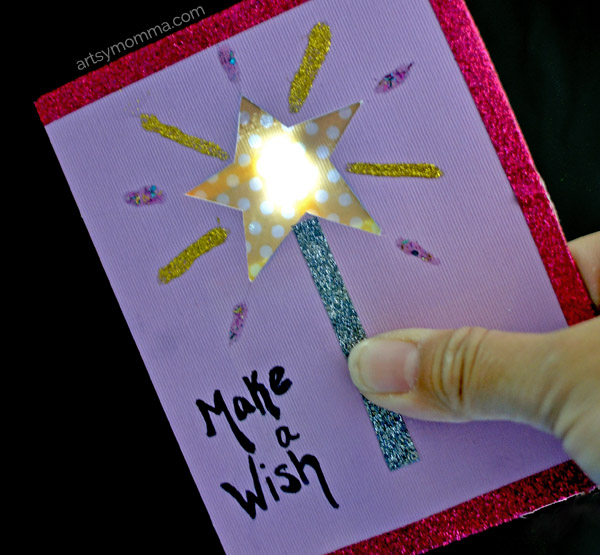
Press the button to make sure it works. So cool!
Now you can wow the kids friend or a family member with a fun birthday card! Have them hold the wand (press the button) and make a birthday wish……

Head on over to the Chibitronics blog where they are featuring Xyron projects from their Design Team team all week long.
If you make this ‘Make a Wish’ Light Up Birthday Card, we’d love to see it! Use the hashtags #xyron or #chibitronics on Instagram or post a photo of your project to any of our Facebook page walls.