Festive 4th of July Lantern Craft Tutorial
*This 4th of July Lantern Craft tutorial post is sponsored by Huggies®. All written content and opinions are our own experience with the product. See more details here.

If you are a regular reader of our blog, you may know that I love to upcycle empty baby food jars. Today I am sharing another fun idea that is perfect for kids as young as toddler-aged as well as adults. This time we made a festive 4th of July lantern craft and are sharing a step-by-step photo tutorial with you.

How to make the 4th of July Lantern Craft
Supplies
- Patriotic Napkins
- Mod Podge or watered down glue
- Scissors
- Paintbrush
- Jars – mason or ones perfect for upcycling such as empty baby food jars.
- Huggies® Wipes
- Paper Plates
- Glitter
- Battery-operated LED Tealight Candles

Start by cutting the napkins or tissue paper into strips and then into smaller pieces. Younger kids such as toddlers, can tear the strips instead.
Place a jar on top of a paper plate to contain the mess – no worries if any spills or drips get on the table! Just grab a Huggies® Wipe to easily clean it up.
Since glue can make fingers a sticky mess, and having done this activity in the past, I knew the kids would get the glue all over their little fingers. This creates a problem because it gets frustrating for them to let the tissue paper go when placing it on the jar. It stays on their finger instead and ends up ripping. They also don’t like having sticky fingers. Rather than have them run to the kitchen sink a bunch of times, I set out a package of Huggies® Wipes and pulled a sheet out for each kid to keep next to them. This way they could conveniently and quickly wipe their fingers! I love that they are hypoallergenic since both my kids have skin that gets easily irritated/hives/eczema as well as anything with a strong perfume smell makes me sneeze a lot.
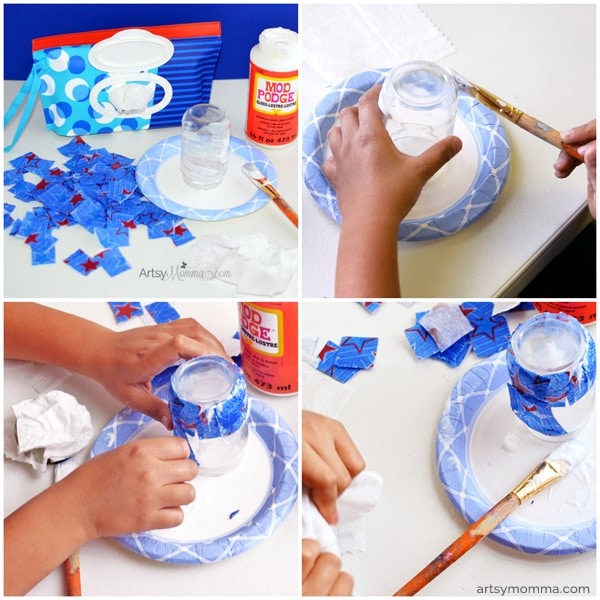
Paint a coat of the Mod Podge or watered down white glue on half the jar. It dries quickly so doing more will most likely result in having to add more glue. Place pieces of the cut napkins over the glue. Using the paintbrush, go back over the top with another coat of glue. This will help seal it down and make it a bit more durable.
Repeat until the entire jar is covered. It is not necessary to cover the bottom, however, both my kids wanted to do theirs which is okay too. Mine is without it being covered and for this candle holder project, it doesn’t make a difference.
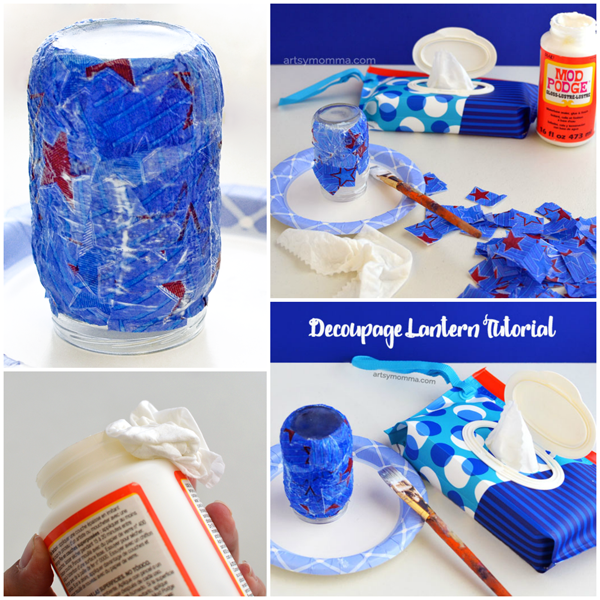
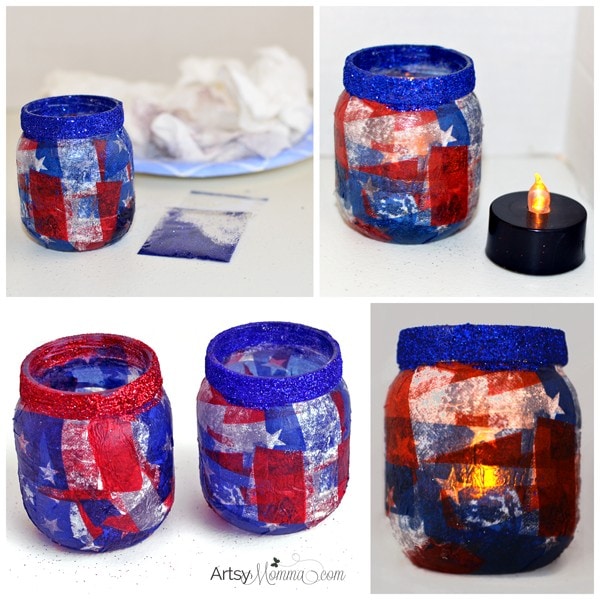
Let it dry for a few hours. Once dry, you can add glitter designs, embellishments or even write or decorate with permanent markers.
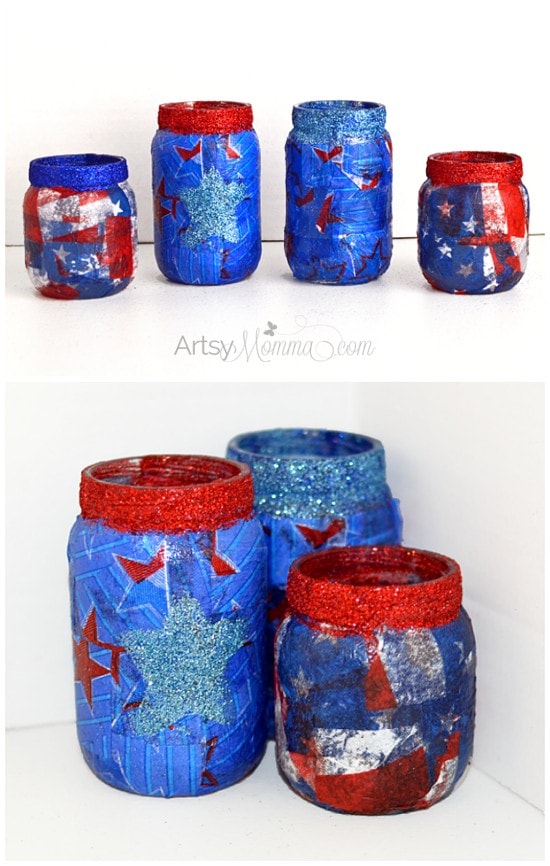
Add a LED tealight to each candle holder and display them as 4th of July decorations! The LED tealights even have an on off switch. *Money-saving tip: we stocked up on a few packages of these last October since the dollar store typically has them for sale around Halloween.
Not only do these make festive candle holder decorations, they can also be displayed as a centerpiece for the table either as a candle or even as little treat jars. They would also be fun to use outside while waiting for the fireworks to start.
We hope you enjoyed our star spangled 4th of July Lantern Craft Tutorial! You can adapt this project to any holiday. It’s also great to introduce to a playgroup or class setting, and the Huggies® Wipes make it a cinch to clean up.
What ways have you used Huggies Wipes® for messy fun? Join the Huggies Sweepstakes by posting an image of your messy kid to Twitter or Instagram with the hashtag #HugTheMessSweepstakes for a chance to win $2,500.

Such an adorable craft and I love the easy clean up idea!
Thanks Katie!
I LOVE this. 🙂 What a great craft project. I use a million Huggies Wipes for the kids so..sign me up for this awesomeness.
Hehe… thanks Meeghan 🙂